10 Things to Know Before Your First Instagram Reel
What’s so important about Instagram Reels? Not much, unless you’ve experienced a drop in engagement on your regular posts to about half!
Seriously. I was scrolling through my own Instagram Insights from the past year and I saw right there in the numbers (as many have) that even though my follower count is higher, and my content quality has stayed the same or even gotten better, overall, post engagement is way down.
But how could this be?! I have no question in my mind that it’s because Instagram has finally introduced a practical, easy-to-binge video feature: Reels.
So… what are Instagram Reels? If you’re late to the party, Instagram Reels are Instagram’s response to TikTok, the social video app that exploded during lockdown because it gave people a way to interact dynamically with friends and strangers without ever leaving home.
Basically, with Instagram Reels, you can record or upload vertical video segments of no more than 30 seconds. (Some people are saying they can only do 15, but I’ve been able to upload completed videos of 30 seconds apiece without any getting cut off. UPDATE 5/10: Some users are now able to post Reels of up to 60 seconds.)
Influencers, individuals, and businesses are using this feature to share tips, hacks, behind-the-scenes, voiceover video memes, dance routines, skits, and other creative entertainment-slash-education.
And no wonder—some of them who were barely on the advent of Reels are now growing by the dozens, hundreds, or even thousands of followers month over month… but it’s not as simple as it sounds.
Here’s what I know.
#1: Your First Reel is Likely to Get a Lot of Views, so Make IT count.
My very first Instagram Reel was posted pretty late into the evening (east coast time) and it was terrible.
I knew it was terrible, but I try to live by the motto, “Do what you can, with what you have, where you are.” I knew the only way to get started with Reels was to just jump in.
What I didn’t know (but later confirmed in this video) was that Instagram, like TikTok apparently, is programmed to send an account’s first Reel out to a lot more people than the algorithm would normally reach with an average post. Instagram wants you to get hooked—to get a taste of what it would be like to go viral, so you’ll use the feature again.
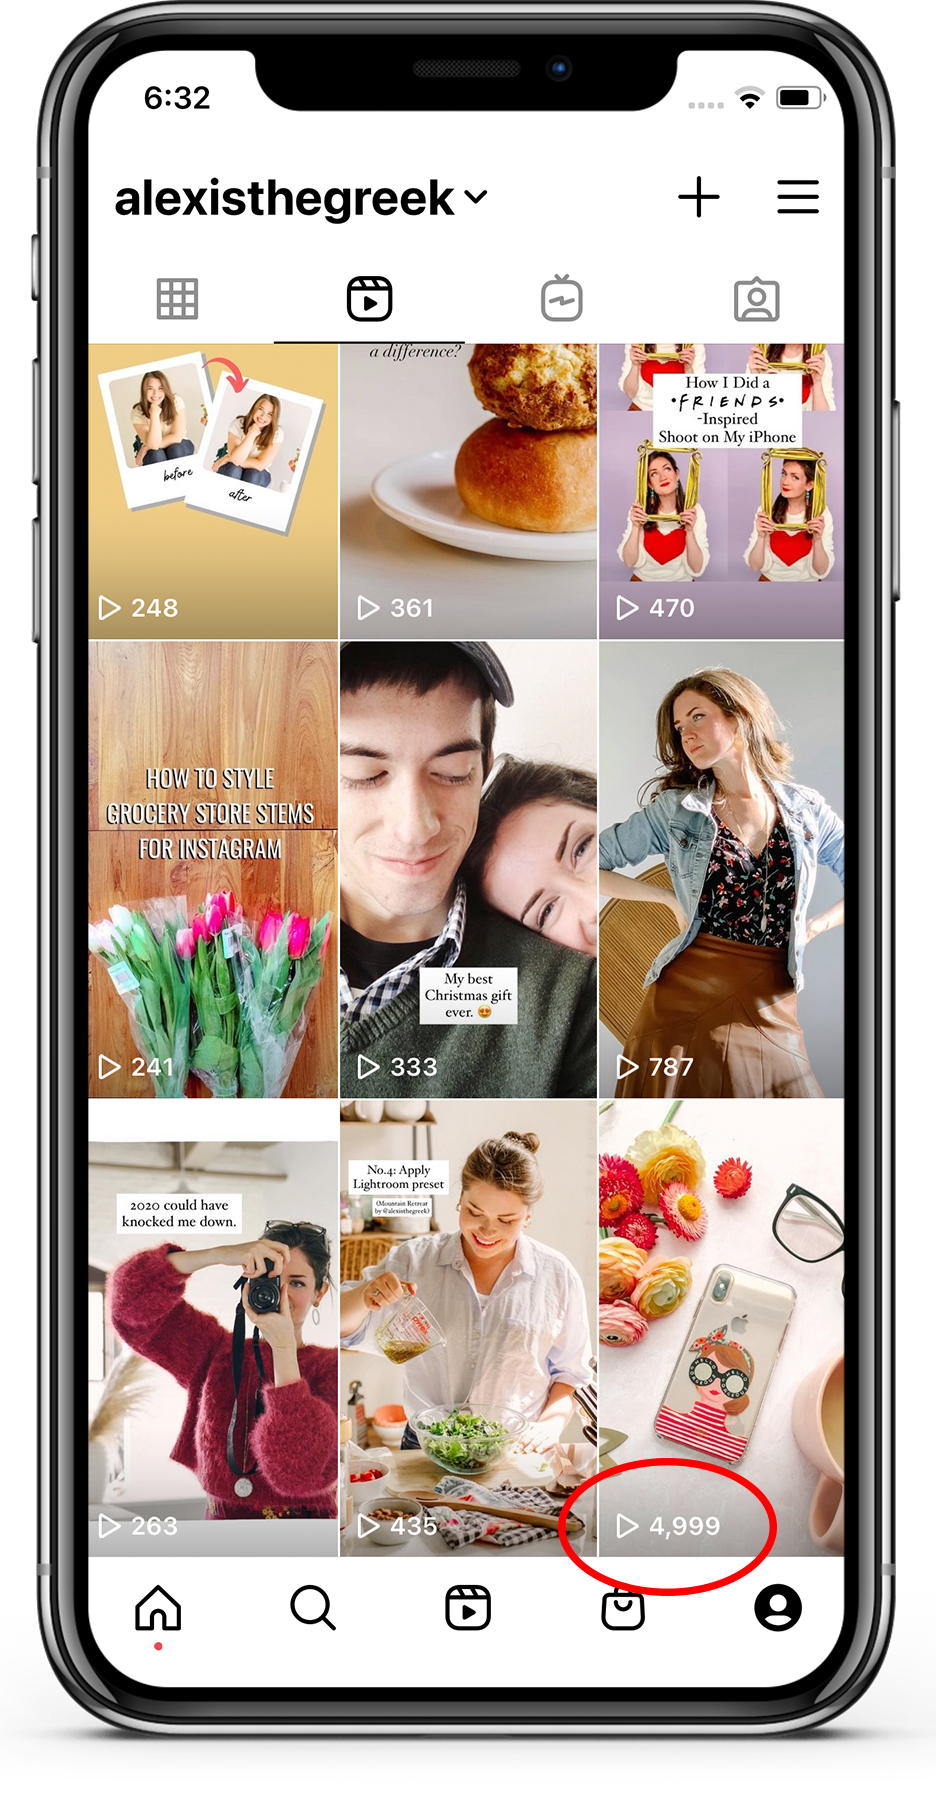
Even though my following at the time was around 860, I reached nearly 5000 views on my first Reel overnight.
However, because the Reel was terrible, I only got 2 likes on it. 2 likes in 5000 views is pretty bad. My subsequent Reels took a lot more effort to get out in front of people because the algorithm read my content as unengaging. Don’t make the mistake I did. Make your first Reel count. (More tips on this below!)
#2: Use hashtags to tell Instagram what the vid is about.

Like any post on Instagram, you want to give the platform as much information as possible as to how to distribute your content—meaning, what searches to show it in, what sort of users to recommend it to, etcetera.
Especially if you’re just starting out using Reels, Instagram will really only have your profile information to go off of in terms of how to classify your content. So it may show your content based on the sounds you use (see point #9 below), or the types of followers you currently have (if that’s mostly friends and family, you won’t get far). Give yourself a leg up by researching relevant hashtags ahead of time.
Hashtags are a pretty big beast of their own, which is why I teach a lesson on hashtags inside my Instagram course, which opens for enrollment February 18. It’s too big a topic to get to in this post, but you can sign up for a reminder about course open or do a little digging on Google and YouTube to get started.
#3: At this time, the primary culture is education meets entertainment—not selling.


The goal on Reels at this time seems to be to get engagement and follows so that people see more of your content overall, whether in the home feed because they’re following you or on the Explore tab as recommended content.
This is different from Stories and regular posts, where it’s perfectly mainstream to share your latest freebie, offering, or flash sale.
Attempting to sell directly from a Reel isn’t pervasive yet, so it’s counter-culture to try it. Instead, for at least your first dozen Reels or so, if you’re a small business rather than a social media influencer brand, focus on delivering quality education relevant to your niche in an entertaining way.
#4: It’s a good idea to batch your content before you use Reels.

In order to garner follows from Reels you post, you effectively want to create a channel that users can binge.
Let’s say you had the idea as a fashion blogger to share scarf-styling tricks. You’d want to create maybe 3-4 Reels just on that topic alone ahead of time, so you could post them all within a short timeframe, maybe 10 days, interspersed with other content in similar series. That way, when people like the first Reel on scarf-styling they see and tap over to your profile for more, there’s actually more for them to watch. If they like it all, they’re more likely to follow (or at least see more of your content in the Reels tab until they commit).
Recording batches of related content ahead of time will also help you post consistently, which will be good for your relevance, memorability, and appearance in the algorithm.
Once you’re happy with a video, you can upload to Instagram to save as a draft by swiping right from the home screen, selecting “Reels,” and choosing the video from your phone. Add audio and text if needed, then tap “Share,” and “Save as Draft.” Beware: Once a Reel is in your Drafts folder, you can’t change the audio.
#5: You Don’t Have to Create Reels In-App; You Can Record Elsewhere & Upload.

So far, I’ve made all my Reels with an app called InShot. I record a video on my phone, and then I clip it down to its shortest version using InShot, and other apps as needed (such as Emulsio for video stabilization).
Instagram does allow you to do all your Reel creation in-app and save what you’ve created in draft form, but I’ve experimented with the draft option and it’s buggy. For example, you could pick a “cover” for your Instagram Reel, save the Reel as a draft, and then publish it only to discover you lost the cover you first picked out. Since there’s no way to edit a cover once a Reel is published, this is a really annoying glitch (more on this below).
Building your Reels in other apps and then publishing to Instagram when you’re ready really helps with ensuring everything you want to be published with your Reel is published.
#6: There are no Instagram Insights for Reels at this time.
If you’ve been around the block on Instagram, you probably have a business account that offers Instagram Insights—Instagram’s version of an analytics dashboard. For a regular post or a story, you can see things like how many interactions, profile visits, website clicks, and follows you received as the result of your content.
Instagram Reels doesn’t have this yet.
You can manually visit the Reels tab on your profile to see how many views, likes, and comments you received from a video you posted there, but as of yet you won’t be able to tell how long the average view was, how many people exited, how many people started to watch but kept scrolling, or how many people shared.
(UPDATE 5/10: You can now access the “shares” for your Reels from the last 24 hours by tapping the 3 dots associated with your Reel. If there were no shares, this option will not appear.)
#7: Share to your profile, delete later if needed.

I experimented with whether or not posting to my profile did anything for my engagement, and it turns out, posting directly to your profile (there’s a toggle to do this before you publish) is a big help.
It seems like Instagram bases some of how far out it pushes your Reel content on how many people “close to home” interacted with it to start with. This makes sense, since other forms of content on the app work the same way—if you post a piece of content that gets a lot of engagement in the first hour or two, Instagram keeps showing it to more people who have engaged with your content in the past, and if they interact with it, then it could end up on, say, the Explore page.
I’ve been trying to make sure my Reel covers look consistent with my profile aesthetic so that sharing to my profile doesn’t disrupt the experience there. However, Instagram had the foresight that not everyone would want to keep a Reel on their main profile, so you have the option to remove a Reel preview from your profile a few days after publishing, while still keeping it in your Reels tab for new visitors. Simply tap the post you want to remove from your main profile, then tap the ellipses above the post (the “…”) and select “Remove from Profile Grid.”
#8: Ask your audience to engage.
When I posted a Reel at a wonky time of day and it didn’t get engagement quickly, I shared it to my Instagram Story with the text, “Would you do me a favor? Would you watch and heart this Reel?” My audience jumped on it, and because they all engaged a lot within 24 hours of the Story, Reels continued to share it with hundreds more people over the coming days.
You won’t want to do this with every Reel, or your audience could start to feel used, but if you’re looking to kickstart your Reels game, this could help on one or two of your videos to get them out in the algorithm!
#9: Use the sounds provided by the app if you can.

On my first Reel, I used a trending song (“Sweet Caroline”) for my video. I’d seen a lot of photographers using it for their photography transformations, and I was “hopping on the trend.”
This probably didn’t hurt how far my Reel went when it reached thousands of people in just 12 hours. I’ll get to why in a second.
On my second Reel, I used a song from the InShot app. I was doing all my editing there, anyway, so why not add the music there? But what I didn’t realize at the time was that I was eliminating myself from audio searches and trending songs on Instagram. For this reason among others, my second Reel didn’t do nearly as well as my first.
Trending sounds are a part of the algorithm. If Instagram registers that there are certain Reels you watch all the way to the end that have a sound in common, they show you more Reels that use that sound (which can be music, voiceover, sound effect…). If you use a sound the way other people in your community are using it, Instagram is likely to share your content with that sound with your audience.
BONUS NOTE: Anything you can tap on when it comes to Reels is a way for people who don’t know you yet to discover you. This includes not just your profile and hashtags, but also sounds and even filters if you apply them directly from the app. Using the sounds and filters that are most popular among your tribe can help you show up in their customized algorithmic feed, so why not take advantage?
#10: Hang out on the Reels tab, observe trends, and save, save, save

There are two ways to save inspirational Reels content to springboard ideas for your own content: One, save the whole Reel, or two, save the sound/music.
To save the entire Reel, you’ll follow the same process you would for any post in the main feed: Tap the bookmark next to the “like” and “comment” buttons. You can access saved Reels using the hamburger icon in the top right corner of your profile.
To save the sound associated with the Reel so you can use it later, tap the sound tickertape at the bottom of the Reel (pictured above). This will open new tab that shows how many users have used the sound so far, as well as show you how they’ve used it. To access the sound for your own Reel, log onto the app, swipe right to open the full post publication tool, select Reels at the bottom, Audio on the left, and tap “Saved.”
Here’s why this is essential: If you’re serious about using Reels to grow your account, you’ll need to be as familiar with sounds for Reels as you are with hashtags for your regular posts. You’ll want to be able to tap into trends, as well as use sounds that Instagram knows your audience enjoys, because Instagram will continue to show your audience Reels that use sounds they’ve watched through to the end in the past, or watched several times in a row.
If you’re always using your own sounds, or sounds that are rarely used on Instagram, you have a lesser likelihood of “catching a wave” and getting your content in front of new eyes specific to your audience.
(UPDATE 5/10: Instagram is also more likely to share original sounds, such as your voice or a voiceover you recorded, than to share music that was uploaded. Additionally, you can create an original voice sound and overlay it with a trending sound for your audience for increased reach.)
Instagram 102 Enrolling Thursday, February 18!

If you learned anything from this post, then you might just be a great fit for AG’s course Instagram 102, all about using Instagram to market your business in 2021—which starts enrolling this Thursday!
Feeling unsteady about any of the following? Stay tuned on Instagram for sneak peeks of and an enrollment link for Instagram 102 with yours truly:
Whether you should be growing your following or converting followers to customers in this season of business
Whether a business, personal, or creator profile is right for you
Which Instagram features your business model should be using for your goals (think gallery carousels, IGTV, Guides, Stories, Reels…)
How to garner more engagement with the features you do use
Whether the actions you are taking are helping or hurting you in the latest algorithm update
What you can do to show up consistently on Instagram without making Instagram your full-time job
How to use built-in features to expand your reach without looking desperate and cheesy, or cluttering your content
Why people seem to unfollow you shortly after following
What your audience will find interesting that doesn’t also “give away the farm”
Whether you need to show your face on your profile in order to grow
What third-part apps (if any) your own favorite creators are using in order to achieve certain effects/results
Why Instagram courses you took in the past didn’t work for you (was it the course, or was it you? Hint: It might very well have been the course…)
How to block bots and fake partnership offers from your profile
Where Instagram fits into your overall funnel
Excited to learn more? Follow Alexis The Greek on Instagram and look out for an IGTV episode this week!
As always, pin this post so you never lose it, and share with a friends who needs this top-shelf intel!

HELLO! MY NAME IS ALEXIS.
Coffee lover, day dreamer, foodie, and creative. I believe in doing what you can with what you have where you are. I blog to help you do more with what you have. I hope you love it here!


Photos are expensive, I’ll be the first to say it. So how can you make the most of your photography budget for 2022? Here are my top tips for curating a PROFITABLE shot list!